

SharePoint Workflows:
3 examples to automate SharePoint lists
SharePoint Online, with its features for managing documents and content, forms the foundation of the Microsoft 365 digital workplace.
Thanks to its native integration with all Microsoft products, SharePoint also allows for automating some of the most repetitive manual tasks carried out on its sites, starting from the company intranet, such as saving Outlook attachments or approving new documents.
In this article, we will therefore explore the integration between SharePoint and Power Automate, with practical examples for creating three flows to optimize internal processes and lighten the daily workload.
What will you find in this article
SharePoint and Power Automate: How and why to integrate them
SharePoint Online and Power Automate are among the main tools in Microsoft 365. The former was developed to allow companies to build the digital workplace, with the intranet at its core. Users can use SharePoint to:
- provide quick access to business services;
- publish targeted news posts and newsletters;
- create dynamic libraries with shared files and documents;
- build sites dedicated to departments, offices, events, and special initiatives.
Power Automate, on the other hand, aims to simplify the management of internal processes by creating custom automations in a low-code mode, meaning no coding is required.
This means giving everyone, whether they are experienced in programming or not, the ability to create automations that can:
- archive attachments without the user having to open the emails;
- send notifications every time a specific event occurs;
- manage the approval of new content created in a specific library;
- etc.
The integration between SharePoint and Power Automate allows companies to link their workflows to a centralized content ecosystem, enhancing collaboration and productivity. For example, it is possible to set up automations that notify a team or manager when a document in SharePoint has been updated, or that archive and categorize files in real time when added to a library.
Thus, it is a synergy that makes information management within the organization more efficient, with great scalability, allowing the people involved to focus on more strategic and creative tasks.

What is intranet.ai?
intranet.ai is the ready-to-use corporate intranet designed to cut implementation costs and time, and create a collaborative and modern digital work environment:
- From €3,950/year for a complete intranet
- 80+ applications, including advanced search, document management system, push notifications via Teams, organization chart, personnel profile and FAQ pages
- Integrated with SharePoint Online and Microsoft 365
SharePoint and Power Automate: Where to start for integration?
The first topic to address in order to understand how to integrate SharePoint Online and Power Automate concerns the points of contact between the two platforms. By "points of contact", we mean the different types of items to which a workflow can be linked.
In the case of SharePoint, most automations are linked to lists and document libraries.
The reason is very simple: SharePoint is the content management system (documents, communications, etc.) of Microsoft 365, and the platform's lists and libraries serve as the operational center for creating, sharing, and storing such content.
Power Automate automations, therefore, link to SharePoint lists and libraries, whose dynamics constitute the events called "Triggers", which initiate the series of tasks included in the flow.
For SharePoint, there are over 10 different Triggers. Among the main ones:
- Inserting a new file into a list or library.
- Updating a file in a list or library.
- Deleting a file from a list or library.
Each of these Triggers can be linked to different automations, such as sending custom notifications via Outlook or Microsoft Teams, or creating a dynamic report based on Power BI.
The possibilities are numerous: we recommend exploring the "Templates" section, accessible from the main Power Automate interface, to discover them. In this section, you can view the catalog of pre-configured flows to link to Microsoft 365 tools or third-party applications.
By filtering for the word "SharePoint", the results will show the most commonly used automations, ready to use, for managing business information through lists and libraries.
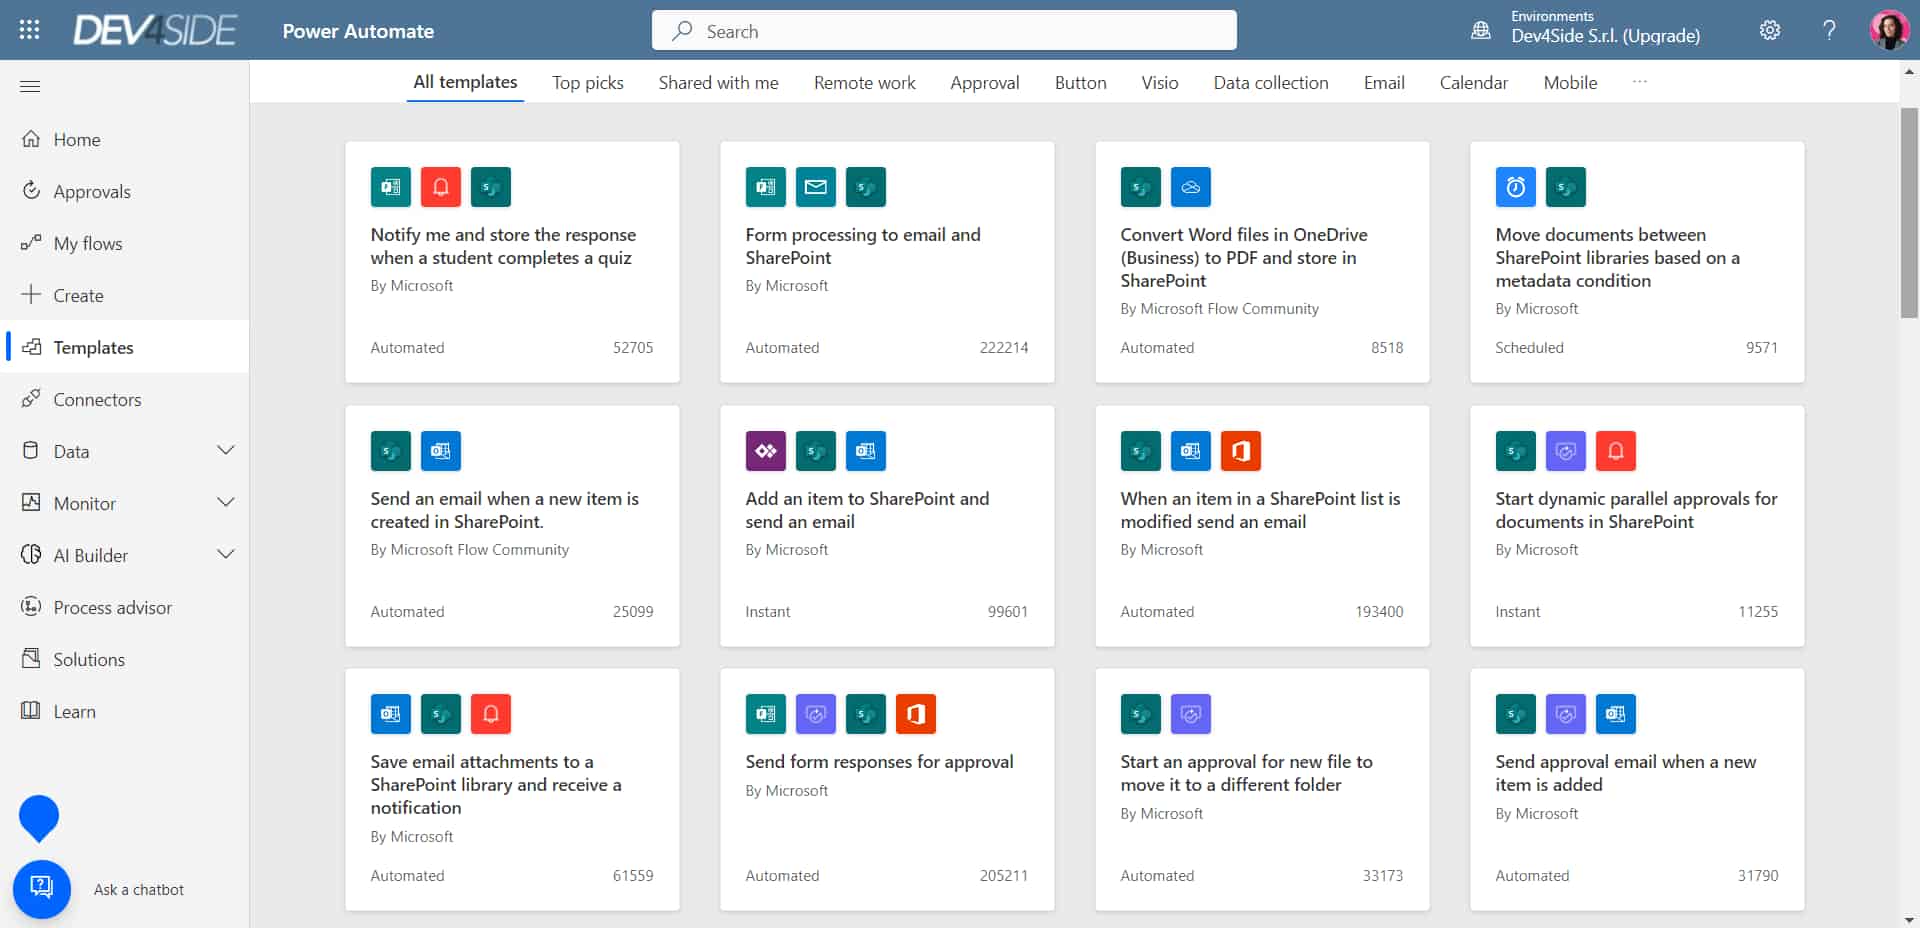
Examples of pre-configured Power Automate flows for SharePoint
We also want to emphasize that it is possible to build workflows where SharePoint is the final step or even the ultimate destination of their process. In this case, the Trigger will be external to the platform.
Let's clarify with an example.
With Power Automate, we can build a flow that starts when an email from a specific sender arrives. The receipt of these emails represents, therefore, the Trigger of the flow.
Once the emails from the specified sender are received, the flow could perform the Action of saving any attachments to the SharePoint library shared with our team or department colleagues.
In this way, corporate archives can be configured to update in real time and notify users with access to the collection about the addition of a new document. Convenient, right?
Think of the amount of time we could save if manual, often secondary, tasks were managed by our own digital work environment, starting from the archives in collaboration sites, the extranet, or the company intranet of SharePoint Online.
The company would reduce the chances of making mistakes in managing materials and information, gaining the necessary focus from workers to tackle the more strategic tasks of their job.
But before painting a flawless picture, let's move on to the second key topic to understand how the integration between SharePoint and Power Automate works. Let's talk about its limitations, along with possible solutions to work around them.

SharePoint and Power Automate: Are there limits to integrating them?
Power Automate allows you to build workflows in low-code mode. This means that even users with limited programming knowledge have the ability to automate their tasks without having to rely on crude or underperforming solutions.
However, there are limitations in the functionality of any tool designed to be both precise and, at the same time, accessible to a wide audience of users. Power Automate is no exception.
Starting with one of the most important limitations, it is worth mentioning that Power Automate flows have a 30-day expiration, with a countdown that begins when the individual flow is triggered by the set trigger.
This limit should be considered especially for automating processes like approvals, which are often performed by relatively long and multi-level flows.
If users are delayed in responding to the approval request, it is likely that the flow will not complete in time. The result would be the suspension of the flow itself.
Unfortunately, if the creator of an automation finds themselves in this situation, they will be forced to manually restart the flow.
To avoid this inconvenience, we recommend splitting more complex flows into shorter, chained automations.
This way, each flow can be focused on a specific group of approvers, avoiding the situation where the automation as a whole wastes time instead of saving it.
Another limitation worth mentioning is unidirectionality.
In other words, it is possible to link an item from a platform to several automation flows, but not the other way around. In fact, each flow configured within Power Automate can be connected to only one item from a single platform. For example, it is not possible to link an automation to different lists or libraries.
The problem, therefore, remains the amount of time that would be required to build the same flow from scratch in order to apply the same automation to multiple repositories.
But even in this case, we have a solution.
Although it is impossible to completely eliminate the unidirectionality of automations, we recommend copying or exporting custom flows.
To do this, simply go to the Power Automate interface, select the flow of interest by right-clicking and click on:
- "Export", to download its content as a .zip file and import it into other environments.
- "Save as", to create a clone of the flow within Power Automate.
At that point, all that’s left to do is to add the references to the new list or library to be associated with the cloned flow: and you’re done.
However, in case you need to apply the same automation to just a couple of collections in SharePoint, there is an alternative solution to the one just mentioned.
In fact, it is possible to access a SharePoint list or library and select the "Automate" option in the top-right corner. By doing so, users can manually apply one or more of their automations to the files in the entire collection.
SharePoint Workflows: 3 automations for SharePoint lists
Let's now look at three real use cases of the integration between SharePoint Online and Power Automate, to automate the following actions:
- save the information collected through a Microsoft Forms form
- archive attachments received in the Outlook inbox
- approve a new document via Approvals
Of course, these are just a few of the possible workflows that can be built to improve information management in SharePoint lists and libraries. However, many clients have asked us over the years to implement these three automations in their company intranet, which we will explore in detail shortly.
We decided to start here to showcase part of the huge potential that SharePoint automation with Power Automate offers.

SharePoint workflows to save responses from Forms
Forms is the Microsoft 365 tool for creating smart questionnaires. With its forms, you can test knowledge and analyze feedback from the corporate community.
Among its features, it is worth highlighting the branching of questions to personalize each user's path and the analysis of the "Ideas" section, which provides an original view of the collected information.
In this article, we will focus on how Power Automate allows you to automatically save responses from Forms into a SharePoint list. Let's look at the steps to follow in detail.
1. Create the SharePoint list that will store the form data.
First, it is important to set up the list correctly. To do this, we use columns and set the title (or better, metadata) to match the type of information collected from each of the questions in the Microsoft Forms form.
For example, you could add a "Role" column corresponding to the question "What is your job?".
2. Go to Power Automate and open the "Record from responses in SharePoint" template.
The various pre-configured flows in Power Automate are available in the "Templates" section on the left of the interface. To speed up the search, you can use the search bar at the top and filter by "SharePoint".
Among the first results, the "Record from responses in SharePoint" template will appear.
3. Name the flow and select the "When a new response is submitted" trigger.
This trigger, or event, will be at the top of the suggested list for the selected template. Once you choose the trigger, you will access the pre-configured flow ready to be customized.
The first thing to do is to indicate which Microsoft Forms form it should connect to. You need to enter the name of the form in both the trigger and the first action of the flow, called "Get response details".
4. Configure the "Create item" action.
Now, you need to tell the flow how to store the responses. Here’s how to proceed:
-
- Indicate the site with the target list: if it does not appear among the suggestions, click on "Enter custom value" and enter the URL.
-
- Indicate the list where you want to store the responses.
-
- Fill in the sections that will open.
These correspond to the columns of the indicated list, and if they are customized correctly as described in step 1, you just need to match each section with the corresponding question.
For example, if the list has the "Years in the company" column, Power Automate will suggest it as a section to match with the form question "How many years have you worked in our company?".
It may not seem like it, but the matching will be quite intuitive.
5. Click "Save".
Once saved, the flow will start doing its job. However, if the platform does not save the automation within about 10 seconds, there might be issues.
To understand what errors might have been made, you can always use the "Flow checker" tab (next to the "Save" button).
A window will open showing exactly what problems are preventing the flow from being triggered. Just fix them and save again.
Now we have configured the workflow to save, organize, and analyze responses and data from Microsoft Forms surveys in SharePoint.
However, let’s emphasize that this example is just the starting point.
Any Power Automate automation can always be extended with additional features, such as sending a thank you email or a notification on Microsoft Teams to alert about a special response. For example, a 5-star rating.

SharePoint workflows to archive attachments from Outlook emails
Let's move on to the second most common type of flow used in businesses, to automatically save the attachments received in the Outlook inbox. This is an automation that can archive documents, images, and other content attached to business emails in a SharePoint Online list or library.
Let's see how to set up this flow in Power Automate.
1. Create the SharePoint list to store the attachments.
As we saw in the Microsoft Forms example, the first step is to configure the columns of the target SharePoint list or library, inserting the key information to store the documents coming into your email inbox.
For example, we could set up columns with values like "Sender", "Email body", and "Date received".
2. Go to Power Automate and create the automatic flow.
To create the flow from scratch, click "Create" on the left side of the main interface. The platform will propose different types of flows, but the one we are interested in is called "Automated cloud flow".
Once the flow is selected, the blank design canvas will open. Now, choose the Trigger: in this case, we need the event "When a new email arrives".
3. Click on "New step" and select the Action "Create item".
This will open a window to specify how to store the information in the target SharePoint list or library. Here’s how to proceed:
-
- Specify the site where the target collection is located: if it's not shown in the suggestions, click "Enter custom value" and enter the URL.
-
- Specify the list where the attachments will be stored.
-
- Fill in the sections that will appear.
These correspond to the columns of the indicated collection, and if customized correctly as mentioned in step 1, you just need to match each section to the corresponding question.
For example, for the "Sender" section, we could match the "From" item.
4. Select "New step" and insert the Action "Apply to each".
This specific category of Actions groups one or more Actions to be applied to an entire type of items. In our case, the Action will be applied to save all attachments coming into Outlook. Therefore, select the "Attachments" item to configure the "Apply to each" Action.
5. Select "Add an Action" and choose the Action "Add Attachment".
This will open the window to specify which attachment-related information should be saved. Here are the steps to follow:
-
- Specify the site and then the target list.
- In the "ID" section, select the "ID" item from the SharePoint Connector.
- In the "File name" section, choose the "Attachment name" item.
- In the "File content" section, insert the "Attachment content" item.
6. Click on "Save".
That’s it: the flow is now ready to perform its task.
However, if the platform does not save the automation within about 10 seconds, there may be issues.
To understand what errors might have been made, you can always use the "Flow checker" tab (next to the "Save" button).
A window will open, where Power Automate will precisely tell you what issues are preventing the flow from being activated. Just correct them and save again.

SharePoint workflows to approve a new document with Approvals
Now that we have seen how to automatically save incoming documents in Outlook mail, let's see how to create workflows for the approval of each new document added to a SharePoint Online library.
This is possible thanks to the involvement of Approvals, the Microsoft 365 application designed to connect users who need to approve new content or who need to be informed about any changes made by colleagues in shared repositories. The innovation introduced by Power Automate in this case is the ability to automate the sending of approval requests and the update of documents in SharePoint if the changes are approved.
Here are the steps to follow to create the automation.
1. Access Power Automate and create a new flow.
To create a flow from scratch, click "Create" on the left of the main interface. Then, choose the category "Automated cloud flow".
There is a ready-to-use template, but here we will explain how to configure the automation from an empty design canvas.
2. Choose the Trigger "When a file is created or modified (properties only)".
Now configure the Trigger, or triggering event, to tell the flow which SharePoint library to connect to. Here are the steps to follow:
-
- Specify the site containing the library of interest.
- Specify the target library.
- Specify the folder with the documents to approve.
3. Select "New step" and then the Action "Start and wait for an approval".
Power Automate will offer several types of approval, from one that depends on the response of the first contacted user to one that requires feedback from an entire group of people.
In our example, we are considering the case where only the team manager needs to approve new documents. Therefore, we proceed with the "Only the first user to respond must approve" category.
4. Configure the "Start and wait for an approval" Action just inserted.
Now we need to customize the request that Approvals will send to the approver users. Here are the steps to follow:
-
- Give a meaningful title to the request (e.g. "Approval for new HR document").
- Provide the email address of the users to be contacted.
- Insert the "Link to item" element in the "Item link" section. This way, approver users will be able to access the document.
5. Click "New step" and add an Action "Condition".
Conditions are one of the most distinctive features of Power Automate. In fact, this type of Action allows flows to take different actions depending on whether a condition is met or not.
In our case, the Condition should create a fork based on the response of the first approver user. If the response is positive, the flow will perform the Actions in the "If yes" path; otherwise, it will proceed along the "If no" path.
6. Set the "Condition" Action just inserted.
Since we are building an approval flow, the Condition should be set with the following logical expression: Outcome is equal to "Approve".
7. Create the "If yes" path.
Now we configure the path the flow will take if the approver user responds positively to the approval request. As always, the automation can be adapted to your needs. Below, we list hypothetical steps, but they are often used:
-
- Add the "Send an email" Action.
- In the "To" section, specify the email address of the users to inform about the positive approval.
- Write the subject and body of the email. We recommend using Power Automate's dynamic content to incorporate interactive elements in the text, such as the link to the newly approved document.
- Add the "Move file" Action.
- Specify the site with the source folder.
- Insert the "Identifier" element (not "ID") in the "File to move" section.
- Specify the folder containing the approved documents.
- Add the "Send an email" Action.
8. Create the "If no" path.
Now it's time for the path the flow will take if the approval request is rejected. Again, we provide hypothetical steps to configure the path:
-
- Add the "Send an email" Action.
- Insert the email address of the users to inform about the failed approval in the "To" section.
- Write the subject and body of the email.
- Add the "Send an email" Action.
9. Click "Save".
The flow is now operational. However, if the platform does not save the automation within about 10 seconds, there may be issues.
To understand what errors may have been made, you can always use the "Flow checker" tab (next to the "Save" command).
A window will open showing exactly what the issues are that prevent Power Automate from activating the flow. Simply correct them and save again.

Do you want a complete, ready-to-use intranet?
intranet.ai is the SharePoint Online-based solution for simplifying internal communication and digitizing business processes with minimal investment of time and money.
- 80+ features for communication and employee experience
- Branded design, customizable in every detail
- Full integration with Microsoft 365 and Viva
Giuseppe Marchi
Microsoft MVP for SharePoint and Microsoft 365 since 2010.
Giuseppe is the founder of intranet.ai and one of the top experts in Italy for all things Microsoft 365. For years, he has been helping companies build their digital workspace on Microsoft's cloud, curating the people experience.
He organizes monthly online events to update customers on what's new in Microsoft 365 and help them get the most out of their digital workplace.

FAQ about SharePoint workflows
What are SharePoint workflows?
SharePoint workflows are an advanced feature of Microsoft 365 designed to automate and simplify repetitive tasks within SharePoint. With workflows, it is possible to optimize document management, communication, and business processes, reducing manual errors and improving operational efficiency.
Why is it beneficial to integrate SharePoint with Power Automate?
The integration of SharePoint with Power Automate allows you to create custom workflows with little or no code. This combination enables you to automate actions like notifications, document storage, approval requests, and more, making business processes smoother and more controlled. Furthermore, Power Automate enhances SharePoint's capabilities, making it easier to connect with other business tools and applications.
What are some common automation examples with SharePoint workflows?
Some typical uses of SharePoint workflows include: - Saving form responses: Data collected with Microsoft Forms can be automatically saved in SharePoint lists, allowing for centralized collection and management of information. - Archiving email attachments: Email attachments received in Outlook can be directly stored in SharePoint, improving accessibility and preservation of important documents. - Document approval: Documents uploaded to SharePoint can be automatically routed for approval to managers or team members, ensuring control and transparency in the process.
How does Power Automate enhance SharePoint functionality?
Power Automate adds a series of "triggers" to SharePoint, which are events that automatically trigger workflows. For example, adding a new file to a library or updating a document can trigger predefined actions like sending notifications, archiving, or moving to subsequent workflow stages. This automation reduces the need for manual intervention and allows you to configure sophisticated, scalable processes.
What benefits does the integration between SharePoint and Power Automate offer?
The integration between SharePoint and Power Automate centralizes and optimizes workflows, improving collaboration and coordination between teams. Automated processes help reduce time spent on repetitive tasks, increase accuracy, and free up resources that can focus on higher-value activities, such as strategic analysis and innovation.
Keep on reading
SharePoint vs OneDrive: What Is the Difference?

Here we will explore the differences between SharePoint and OneDrive, the two cloud storage systems for the digital workplace of Microsoft 365.
Digital Workplace: Why Does Your Company Need It?

Let's discover what a modern digital workplace is, what benefits it offers, and how to build it by adopting the right strategy and Microsoft technology.
Microsoft 365 Copilot: What It Is, Pricing, and Features

Let’s see what Microsoft 365 Copilot is and why you should invest in it, one of the most powerful modern technologies to enhance daily productivity.